


Wound management is a routine part of first opinion practice, but the complexity of wounds can vary immensely depending on their location, their depth and the structures involved, leading to very different outcomes and prognoses.
Initial presentation
Wounds can present in many different shapes and sizes: a detailed and thorough assessment at initial presentation is essential for decision making regarding treatment, including the potential need to refer, and prognosis. A quick but comprehensive clinical exam (including demeanour, and don’t forget TPR) can provide important information regarding the degree of pre-existing blood loss, pyrexia or other systemic signs of concurrent trauma such as haemoabdomen or pneumothorax. Additionally, a complete assessment of the horse is important to identify any additional, potentially less obvious, concurrent wounds and injuries, particularly those not initially reported by the owner. Although the majority of horses have a comprehensive vaccination history, checking the horse’s tetanus vaccination status and administering tetanus anti-toxin as appropriate is recommended.
Wound assessment and when to refer
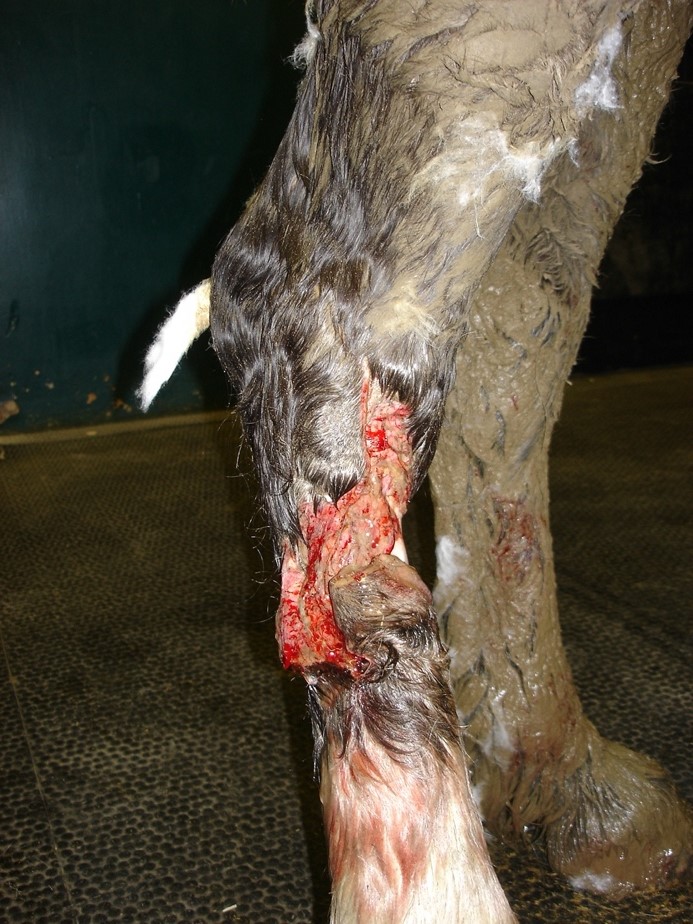
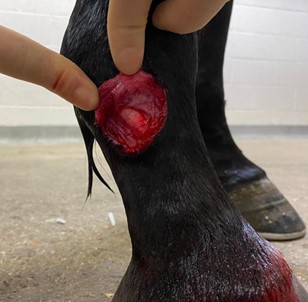
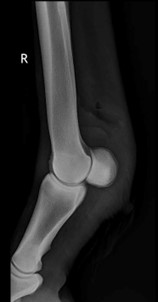
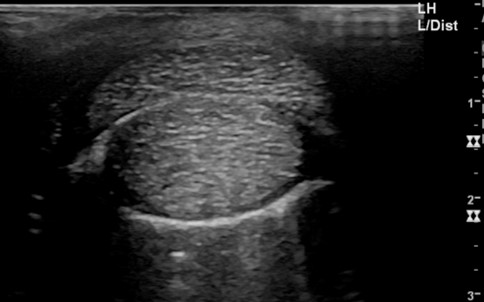
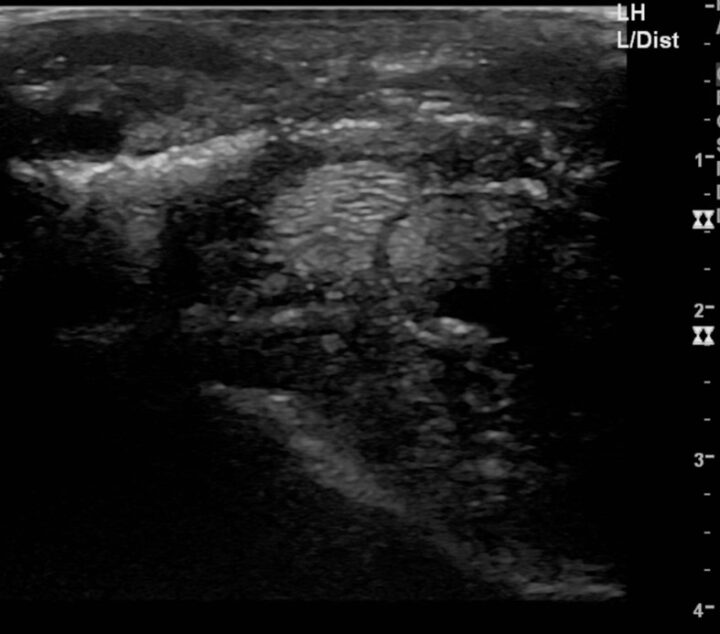
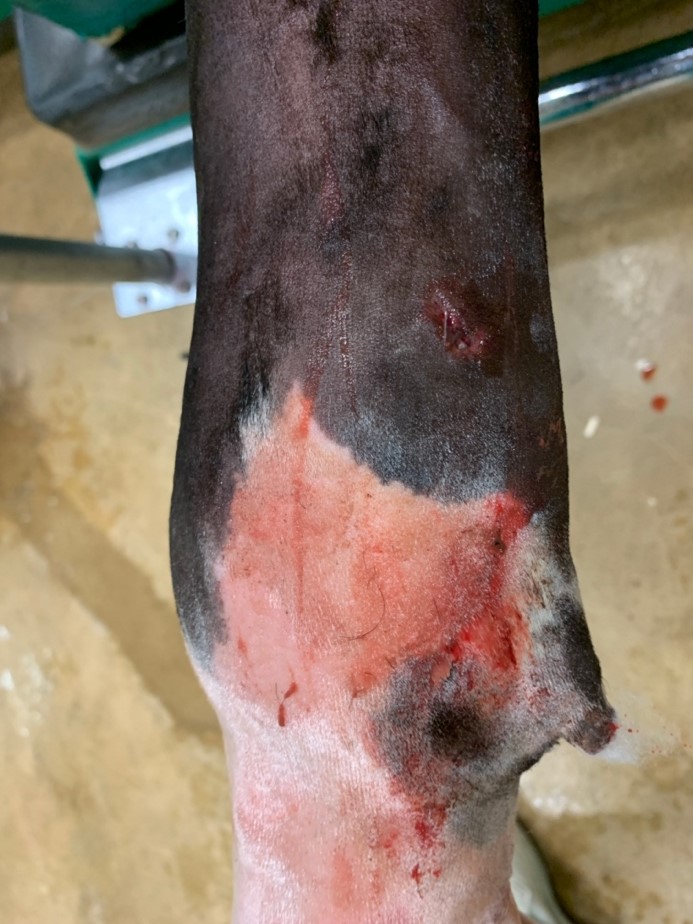
To accurately assess the depth, extension and size of acute wounds, clipping and cleaning are essential, particularly as the wound frequently extends further than anticipated before clipping (Figures 1 and 2). The use of radiographs and ultrasound can help determine involvement of, and damage to, underlying structures, demonstrate the presence of foreign bodies and give an indication of penetration of adjacent synovial structures. Gas within synovial structures may be observed as radiolucencies on radiographs (Figure 3) or hyperechogenicity on ultrasound scan, but they must be differentiated from superimposed subcutaneous gas/air within fascial planes (Figures 4 and 5).
Distension of the affected synovial structure(s) with sterile saline can provide a more definitive assessment of whether there is communication between the wound and joint/sheath, particularly in acute cases
A thorough knowledge of the anatomy of the wound region is important to assess whether the wound involves deeper or underlying structures, such as synovial cavities, abdomen or thorax. Synoviocentesis alone may be definitive in confirming communication with the wound. However, distension of the affected synovial structure(s) with sterile saline can provide a more definitive assessment of whether there is communication between the wound and joint/sheath, particularly in acute cases.
Contrast radiography using non-ionic contrast material (eg iohexol, diluted 50:50 with sterile saline) may confirm communication between the synovial structure and wound or confirm the integrity of the joint, but this can be time-consuming in a field setting. Sterile probes can be used to assess the depth and orientation of the wound, but care should be taken with wounds close to joints and tendon sheaths to avoid inadvertent penetration. Digital palpation with a gloved finger is generally more definitive and informative if the extent of the wound allows.
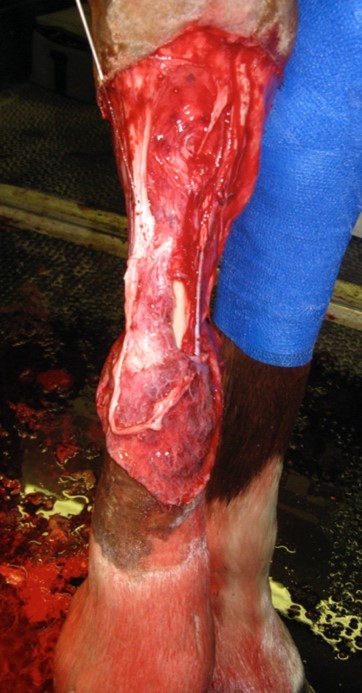
Contamination of the wound with hair, dirt and organic material complicates wound healing. Application of sterile gels to the wound before clipping and wound cleaning prevents additional contamination during this process. Wounds associated with contamination of synovial structures, bone damage or severe damage to other underlying structures are best managed in a hospital setting (Figures 6 and 7).

General considerations and preparation before closure
After complete assessment of the wound, a decision should be made on how to manage the wound: primary closure, delayed primary closure or healing by secondary intention. Primary closure most often gives the best initial cosmetic result, but it is not always the best option for future healing. Wounds with gross contamination sometimes heal better by being left to heal by secondary intention, to promote drainage and prevent the formation of abscesses and closed-off infection.
Sedation and pain relief
Before cleaning and closing, appropriate sedation and pain relief should be administered. Depending on the level of wound contamination and its location, antimicrobials are not always indicated – the BEVA Protect Me guide provides further guidance regarding the antimicrobial choice.
Local anaesthesia can be useful before the process of cleaning starts. A combination of desensitising the regional innervating nerves and a ring block makes the process easier and safer. In some wounds, it can be useful to use topical local anaesthetic on the wound, although the negative effects of local anaesthetics on wound healing are debated with inconclusive and conflicting results.
Wound cleaning
Reducing bacterial contamination and removing debris is one of the most important aspects of managing wounds. Antiseptics such as chlorhexidine and povidone-iodine can be useful in cleaning contaminated wounds, but only in an appropriately diluted solution. If applied incorrectly, these antiseptics (along with alcohol) are cytotoxic and negatively affect wound healing. Saline is a safer option for cleaning wounds, although tap water can be a good practical alternative for acute wounds if saline isn’t available.
Utilising [compromised or loose skin flaps] to cover the defect (even in the short term) after debridement, rather than cutting it off, is recommended
Bacterial load and foreign material can be removed with efficient debridement and lavage. Various techniques are described, but an easy, cheap and efficient way of cleaning contaminated wounds is the use of a bag of sterile saline connected to a 19G needle. This not only flushes and irrigates the wound but also gently debrides the wound, while healthy underlying tissue is left in place. All contaminated and devitalised tissue should be removed. However, while debriding devitalised tissue, it is important to leave as much potentially viable tissue as possible. Compromised or loose skin flaps that initially seem to have little chance of survival can be very useful biological dressings, particularly over certain tissues such as exposed cortical bone. Utilising this tissue to cover the defect (even in the short term) after debridement, rather than cutting it off, is recommended. Sharp debridement with a scalpel blade is very effective, but care should be taken not to traumatise the surrounding skin and vital structures, such as large blood vessels and synovial structures.
Closure techniques and tension relief
Whenever possible anatomical reconstruction of all tissue layers involved in the wound should be attempted. Absorbable suture should be used when closing the muscle/fascia, subcutis and other layers deep to the skin. Both polyglactin 910 (Vicryl) and poliglecaprone (Monocryl) are suitable options. In dirty, potentially discharging wounds, the capillarity of multifilament suture could theoretically increase the risk of infection; therefore, coated multifilament or monofilament suture materials are preferred by some clinicians. Closure of the deeper tissue layers is important to minimise dead space, minimising bleeding after closure and decreasing the risks of seroma formation, abscessation and infection. For an optimal functional and aesthetic result, accurate skin apposition is important. This will be aided by anatomical reconstruction of the deeper layers, which reduces tension on the skin margins and supports the overall repair. Taking time to plan suture position, considering the shape of the wound and the location of the natural tissue tension lines (skin tension or Langer lines), will help to close the wound as close to the anatomical original as possible. This includes mentally dividing the suture line to ensure equal tissue lengths on either side of the repair and assessing which areas will be subject to additional stresses, for example tension due to movement, and to allow for this in the choice of repair.
Most often, a simple interrupted suture pattern is sufficient, and care should be taken to make sure that the skin edges are directly apposed or slightly everted
For the skin closure, there are a variety of suture materials to choose from, and this choice is mainly a personal preference. Commonly used suture materials include nylon and polypropylene, while stainless steel staples are quicker to apply than suturing but don’t appose skin edges as accurately; multifilament sutures should again be avoided due to the capillarity of the material and risk of contamination.
Most often, a simple interrupted suture pattern is sufficient, and care should be taken to make sure that the skin edges are directly apposed or slightly everted (NB: not inverted). Placing sutures too close together will result in excess tension and risks damaging the blood supply to the skin edges: as a general guide, skin sutures should be placed around 5mm apart and 3 to 5mm away from the skin margin (collagenase activity is higher in the 5mm nearest the skin edge), but this will vary with differing skin thickness. A rough guide that can be used is to place sutures 2x [tissue thickness] apart and 1x [tissue thickness] from the tissue edge.
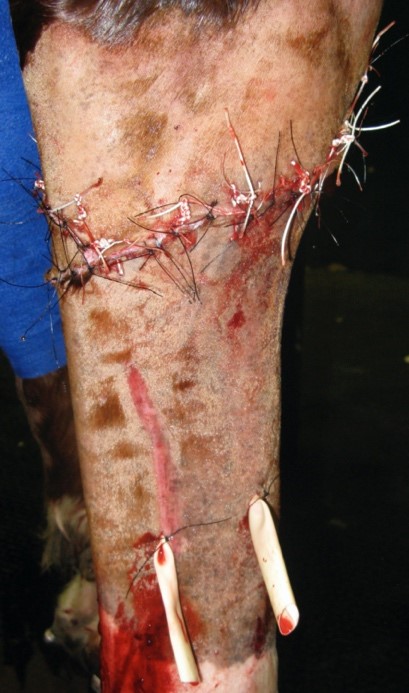
Wounds that are under substantial tension can be a challenge to close. Excess tension risks suture pull-through, poor apposition, delayed closure or dehiscence, and therefore a suboptimal result. Addressing wound tension using tension-releasing techniques can help and is very applicable in a clinical setting (Figure 8).
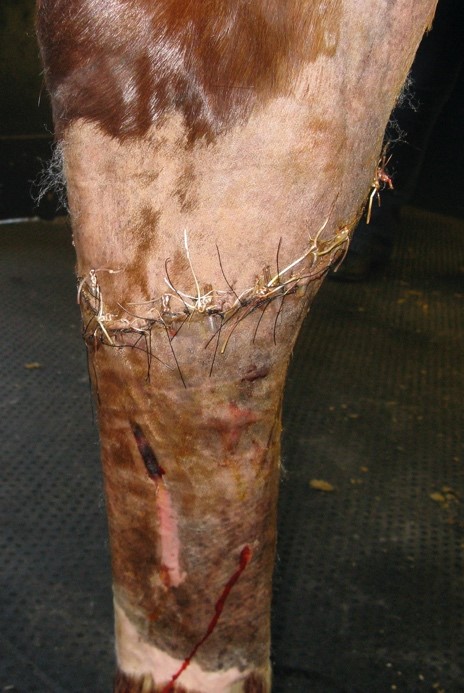
Tension-releasing techniques include:
- Vertical mattress +/− quills/stents: the vertical mattress suture spreads tension distant to the wound edges and limits the risk of damage to the skin vasculature compared to horizontal mattress sutures. The suture can be looped through 10mm pieces of a sterile giving set to further distribute tension forces and reduce the risk of suture cut-through. Simple interrupted sutures can be placed between the mattress sutures to improve skin apposition as needed
- Near-far-far-near: this pattern has two functions. Tension relief is provided by the far element, while the near element ensures good apposition but does leave more suture material in the wound
- Stents: these are best used in minimally discharging wounds. Oversewing the wound with a stent bandage or a rolled sterile gauze can help distribute tension and reduce swelling by applying direct pressure over the repaired wound. The stent is sutured over the wound with sutures placed distant to the wound edge
Wound drainage
For wounds from which a significant volume of discharge is anticipated, providing appropriate drainage is advisable. This can be done with a simple stab incision through the skin distally, at a point where gravity will aid with drainage. These incisions tend to close rapidly and quickly block with fibrin and discharge. Placement of a drain (such as a Penrose drain) can ensure the drainage site remains open, although drains may act as a conduit for ascending infection. The significance of this risk should be balanced against the location of the wound and environmental cleanliness. The drain should be placed as part of the initial wound repair and before skin closure with the drain secured by separate sutures, both proximal in the wound and at the exit site of the stab incision. It is, however, vital to ensure the drain doesn’t become entangled in the sutures placed during wound repair. As the amount of discharge decreases (typically after two to three days) the drain should be removed, while the stab incision is left to heal by secondary intention. More advanced closed suction drains may be more helpful in complex wounds, but are more challenging to manage in the non-hospitalised patient.
Immobilisation
It is essential, however, that the dressing itself does not cause further trauma to the skin and surrounding tissues, with even tension being essential to avoid iatrogenic skin trauma and rubs
To support and protect the wound repair, appropriate immobilisation is necessary in the immediate post-repair period to support the healing tissues and minimise movement, which will disrupt the initial stages of wound healing. This will vary according to anatomical location: a well-applied conforming bandage will be suitable for many distal limb wounds, but a splinted bandage or cast may be necessary to manage wounds over high-motion areas (such as heel bulbs or the dorsal aspect of the fetlock joint). It is essential, however, that the dressing itself does not cause further trauma to the skin and surrounding tissues, with even tension being essential to avoid iatrogenic skin trauma and rubs.


